One of my lab-mates expertly assembled our MakerBot 3D printer a few months ago. I’m not quite sure what happened next, but last week the MakerBot was placed on my desk with the indication that it needed to print within the next few days. I had heard rumors that the stepper motor drivers were blown. I also knew that the Plastruder thermistor was not working. And the Plastruder had never actually extruded anything.
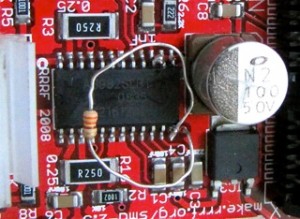
It turns out that pin 12 (half step enable pin) on two of our stepper driver boards was shorting to ground. The symptom of this short was an extremely hot voltage regulator, and by association the large capacitor next to it. The quick and dirty solution was to cut this pin. With both of our motor drivers this was all that was needed to bring the MakerBot axis’s back to life! It is important to check and make sure that MakerBot still moves 1cm when you tell it to move 1cm. Ours was now moving twice as far as we wanted because half stepping was no longer enabled.

The solution to this was different for each driver. On the Z axis all I needed to do was solder a pull-up resistor to pin 12. The Z axis was 1/2 stepping again but this didn’t work on the Y axis. After considering updating the firmware to compensate for the full step, we agreed to swap out the stepper driver chip. Eric’s soldering skills had this done in no time. Once again the MakerBot was precisely stepping in all directions!

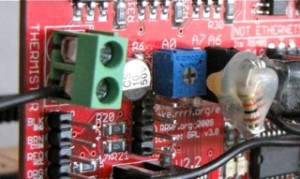
To fix the dead thermistor, the lab had tried several things including re-wrapping the Plastruder head and replacing the thermistor itself. I had a feeling that the analog to digital converter pin was blown on the AVR, and I knew from past experience that I could likely just switch A to D pins and be good to go. Finding the source code for the Plastruder board was the hardest part of this task. I feel like I am missing something obvious here, but I spent hours reading wikis and blogs with no avail. After all that I was only able to find an older version, so I used that. I switched the firmware to use pin 7 and soldered my own filter and pull-up circuit floating in a pool of hot glue above the aux pin 7 socket.
The last problem was to get the Plastruder to actually extrude. The idler wheel was not tight enough, and the ABS was stripping. My first solution was to over-tighten the idler wheel, unfortunately chipping it and breaking the entire thing. Luckily for me a lab partner quickly laser cut a new 6mm wide wheel, and after reconfiguring the Plastruder head I was able to make the new (faster, stronger) wheel fit.
We also have a heated table. A few lab partners have seen it work, but I never have. I just connected the heater to a bench top power supply at about 2 amps and got a nice 107C on the table. Getting the raft to stick to the build platform is challenging, but adjusting the z axis by hand seems to do the trick. Finally, we’re printing parts on our MakerBot. Truthfully, the whole Plastruder is pretty janky, but MakerBot has just released a Mk5 Plastruder head and we’ve got one on the way. Stay tuned…

