Educator Information Sheet
This Educator Information Sheet is essential to understanding how to interpret and navigate the Cubelet Lesson Plans. You will find this to be a handy tool to refer back to as you proceed through the lessons – so keep it readily available.
Find out what Cubelets are all about:

Cubelets Getting Started Guide
If you haven’t already, you should check out the Cubelets Getting Started Guide and the 10 Quick Tips.
See the GuideFor each lesson you will find the following:
Overview
These Lesson Plans will allow you to explore Cubelets with your students. Theselessons are geared to allowing students to explore and discover on their own with you as the facilitator. We want students to do the thinking, analyzing, and discovering – and hope they will learn by questioning themselves instead of you! Everything you should need is included: standards, vocabulary, a list of materials needed, time allotment, evaluations, lessons with a script, facilitation questions, evaluations, extension activities, etc. But, there is plenty of room to tweak the lessons to fit your individual teaching style and the needs of your students and/or school. We encourage you to have your students work in small groups so that, along with learning robotics, they will practice 21st Century skills such as collaboration, communication, critical thinking, problem solving, and decision making. Together, students will expand their ideas and questions in order to think at a higher level than they could by themselves. Together, they will create and explore possibilities above and beyond what you might expect! You are welcome to print out the Lesson Plans, or just read them on a device as you conduct the lesson.
The Robotics Journal
Before you begin using Cubelets in your classroom you will need to be sure each student has some method of “journaling”. Just like scientists, students will need to take notes, collect data, sketch images, jot down questions, make hypotheses, and record their conclusions. We recommend a small journal, which you can easily make by stapling together folded paper, so students can flip back through it during the unit. We want you to encourage students to draw diagrams, label accurately, take precise data collections, and reread to learn from their notes. This is also a way to connect literacy skills (and meet state standards) with science therefore enhancing 21stcentury skills and school-to-career skills.
For further information about using Interactive Science Journals in the classroom:
- http://www.nsta.org/publications/news/story.aspx?id=51882
- https://www.wastatelaser.org/science-notebooks/
- http://www.plantingscience.org/index.php?module=content&func=view&pid=117
Feel free to download a free Robot Journal template:
The Basics
This is information you can refer to in order to plan ahead, set up, and be prepared to run the lesson. You will quickly see the time necessary, the goal and objectives written out for you and for the students, the essential questions, standards, concepts covered, vocabulary and materials needed. Here, you will also find out what age group/grade the lesson is geared for. B stands for the beginner and is geared for grades one through three. M is for the middle age group, grades four through six. And, A is for the advanced, seventh through twelfth grade. But, this is certainly not cast in stone. You can jump between these levels to suit your students’ needs. Gear up if you have students who need a challenge, or find some lessons for review in a lower level. Also, within each age grouping there are alternative lessons that offer challenges and others for reviewing skills. So, don’t be afraid to dive into all the lessons and tweak the lessons as you see fit –it’s easy to do and you know your students best.
Time for the Lesson
Within the Basics section you will find a time range indicating the amount of time it will take to carry out the lesson. It is indicated as a range so that you can modify the lesson to fit your needs. Maybe you are the kind of teacher that needs (or your students need) more time to demonstrate and explain, or maybe your philosophy is to let your class jump right into exploratory time and learn by trial and error. With a time range, you can decide on these important issues. Or, maybe one day you want your students to share their work with others, and another day your science block time is cut in half. The time range gives you the flexibility you need as an educator.
Goals, Objectives, Essential Questions
What’s the difference? Many educators like to write out the objective for the lesson in a way that their students can relate to, others prefer more standard language. These are not “musts”– modify them to fit your needs. Again, just use them if you need them
Prior Knowledge
In this table you will find out what you, as the educator, should know before teaching the lesson. You will also see what the students should know, with a list of possible lessons, or concepts. These are topics you will want to make sure you have taught prior to the intended lesson. We have also included some Educator Tips to keep in mind to be sure the students are encouraged to figure out problems for themselves.
Prep
How to set up for the lesson is included here. You will know exactly which Cubelets and how many you will need for each lesson. Keep in mind that, if you don’t have all of the necessary Cubelets, you can set up a Learning Station(s) and have smallgroups of students rotate through the station.
Divide the class into groups of 2-5 students
In the PREP section you may see the instructions to divide your class into small groups. The purpose here is that scientists often work together to solve problems. When students work as a team they are learning how to use critical thinking skills as well as enhancing their skills in collaboration and communication – essential 21st Century Skills. We suggest that you place students in a group that they will remain with throughout a Cubelets Robotic Unit. In this way, students will be able to learn and improve skills such as collaboration and communication as they figure out how best to work with the different personalities of their group. Differences and possible problems will need to be worked out rather than ignored, something that is missed if groups are constantly changing. You will want to make each group as diverse as possible so consider mixing up learning styles, work-effort levels, personality types, etc.
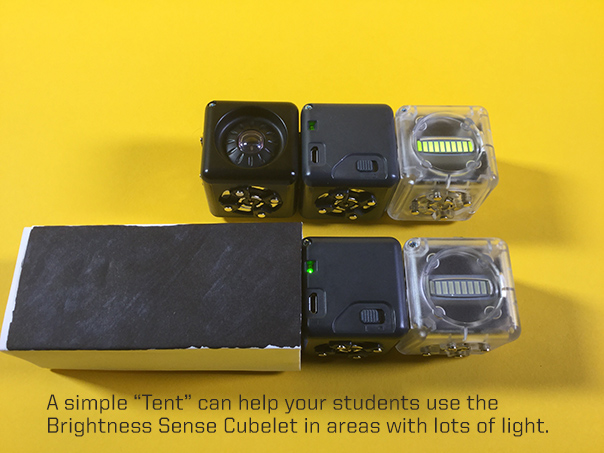
The Tents
It may be difficult to use the Brightness Sense Cubelet in a brightly-lit classroom so we have suggested you may need to construct some “tents” for your students to use. This could be an Engineering Design Project for some or all of your students! They could be as simple as a piece of cardboard to hold over the cubes, or some draped material over a small structure that looks like a tent, or maybe you just have your class go under a table that acts as a tent – or everyone shuts off the lights at the same time. Again, you decide what works for your class and environment.
The Lesson
Here you will find your lesson – a script that you can tweak to suit your needs. There is an introduction and a closure. You will also find questions to ask the students as you check in with them while they are participating in the exploratory activity.
End Results
In this part of the plan you can check yourself, and your students, to see that they have mastered the intended objective/goal of the lesson. You may be able to determine this on your own by observation and reading their Journal entries. But, sometimes we have included worksheets and/or evaluation sheets you may want to use if you feel you need some evidence of their grasp on the new concepts taught and explored.
Optional quick write for prompt and/or evaluation
What you will find here is a prompt, or evaluation. You can use this as a way to evaluate your students to see how they are understanding the concepts in the unit, or you may choose to have students use this as a writing prompt in their Interactive Robotics Journals. Again, you get to decide what works best for you and your students.
What to go to next
For more review
These are activities that are reviews for students who are struggling with the concepts, or just need to spend some extra time on a particular exploration. Many of them are geared towards a small group-guided structure, so it may be necessary for you to find time to work with them on their own, or to have an educational aide carry out the lesson.
If Objectives are met and Extension Activities
If objectives are met and you are ready to advance your students to the next lesson, that lesson title will be listed here.
There are also extension activities that will enhance the lessons. These tend to be more open-ended and creative and will allow students to build upon what they have learned. You don’t have to use these at all, but you may want to use them as review for some students, as a challenge for others, or you may want to use them in place of other lessons – you decide.
Note: At times, the lessons may be the same for the students at different levels because many lessons are essential to all students – especially in the beginning as they learn the basic concepts involved in using Cubelets.
More References
For additional resources, please see the Educator Hub.