A.K.7 | Light it Up
An Introduction to Robots and Cubelets
Created by: Brandy Ray
Lesson Overview:
In this lesson students will begin to recognize that robots can be programmed to do jobs that solve problems. This lesson should be completed after students have had many experiences building basic, three-cube robots with Cubelets.
The Basics:
Ages: 4-7Time: Part 1: 15 – 20 min., Part 2: 20 – 25 min.
Prep Time: 5-10 minutes
Lesson Objectives (for the students): Students will create a Fraidy Bot, a robot that exhibits a creature behavior by running away from predators.
21st Century Skills: Creative Thinking, Collaboration, Flexibility
Concepts: Literacy, Science Technology
Required Cubelets: Mini Makers or original Modular Robotics Educator pack, split into baskets of 6 – 8 cubes, including Inverse Cubes and Passive Cubes.
The Standards:
ISTE: International Society for Technology Education- Creativity and Innovation C: Use models and simulations to explore complex systems and issues.
- CCSS.ELA-LITERACY.RL.K.7: English Language Arts – Integration of Knowledge and Ideas – With prompting and support, describe the relationship between illustrations and the story in which they appear (e.g., what moment in a story an illustration depicts).
- CCSS.ELA-LITERACY.SL.K.2: Speaking and Listening – Comprehension and Collaboration – Confirm understanding of a text read aloud or information presented orally or through other media by asking and answering questions about key details and requesting clarification if something is not understood.
- CCSS.MATH.CONTENT.K.CC.B.4: Counting and Cardinality – Count to Tell the Number of Objects: Understand the relationship between numbers and quantities; connect counting to cardinality.
- Pre-K TS GOLD Standard 3 – Social and Emotional: Participates cooperatively and constructively in group situations.
- Pre-K TS GOLD Standard 11 – Cognitive: Demonstrates Positive Approaches to Learning
- Pre-K TS GOLD Standard 18 – Comprehends and Responds to Books and Other Texts: Interacts during read alouds and book conversations
- Pre-K TS GOLD Standard 20 – Mathematics: Uses number concepts and operations: C. Connects numerals with their quantities
- LS1.C: Organization for Matter and Energy Flow in Organisms – All animals need food in order to live and grow. They obtain their food from plants or from other animals. Plants need water and light to live and grow. (K-LS1-1)
Lesson Plan:
Part 1 – Anticipatory Set – Are you Afraid of the Dark?
Time: 15-20 Minutes
Section Overview: In this section, students will explore jobs robots can do to help people by defining a problem that can be solved using Cubelets.
I. Question of the Day:
Are you Afraid of the Dark?: Use this as the question of the day to engage students in a conversation about whether or not they are scared of the dark. Students can answer the question by raising their hand and their answers can be tallied or student responses can be tracked in a different way.
Connect to Math:
CCSS.MATH.CONTENT.K.CC.C.6 – Counting and Cardinality – Compare Numbers: Identify whether the number of objects in one group is greater than, less than, or equal to the number of objects in another group, e.g., by using matching and counting strategies.
An easy way to integrate math into any Question of the Day activity is to analyze the numbers once students have all answered the question. Compare yes and no answers to integrate concepts such as:
- How many
- More Than/Less Than
- Equal to
- Greater
- Fewer
- Comparison
Be sure student answers are displayed visually either using tallies, name cards, or another method. For more information about using Question of the Day to integrate mathematics, see the link below:
Pre-K Pages – Question of the Day – http://www.pre-kpages.com/question-of-the-day/
II. Read a Story About Being Afraid of the Dark:
Students may already have a favorite classroom story about needing a night light when the lights go out. If not, read one of the following fun books that will help students recognize that a night light is all you need to keep your fear of the dark at bay
- The Dark by Lemony Snicket and Jon Klassen
- The Berenstain Bears in the Dark by Stan and Jan Berenstain
Choose a story that works well for your class. Regardless of which story you choose, make sure that the character in the story relies on a night light, flashlight, or some other type of light to feel safer in the dark. This will help connect the story to the design challenge.
After reading the book, discuss what makes each character feel safer when they are afraid of the dark. (A night light should be one answer that is mentioned.)
Continue discussing the text with some of the following questions:
- Do you have a night light?
- Why do night lights help us feel safer when we’re in the dark?
- Are there other things that can help us feel safe in the dark?
Part 2 – Night-Lightbot Design Challenge
Time: 20-25 Minutes
Materials: Mini Makers or original Modular Robotics Educator pack, split into baskets of 6 – 9 cubes, including Inverse Cubes and Passive Cubes
I. Robots do Jobs:
One of the reasons people create robots is because they can help us do jobs. Do you know any jobs that robots do?
Read Robots, Robots, Everywhere by Sue Fleiss
Discuss the different types of jobs robots can do. Tell students the jobs that robots do can help solve problems that people might have.
II. Introduce Challenge:
In one of the stories we read, the character was afraid of the dark. I bet we could use our Cubelets to come up with a way to solve the character’s problem in the story. Can you think of a type of robot we might be able to create that could help the character? (Create a robot that lights up.)
Objective:
A great idea would be to create a robot that could act like a night light or flashlight for the character! But wait, we know how to make a robot that lights up with the Cubelets, but they only light up when it is light in the room. Today your job is to work with your group to come up with a way to create a robot that lights up in the dark.
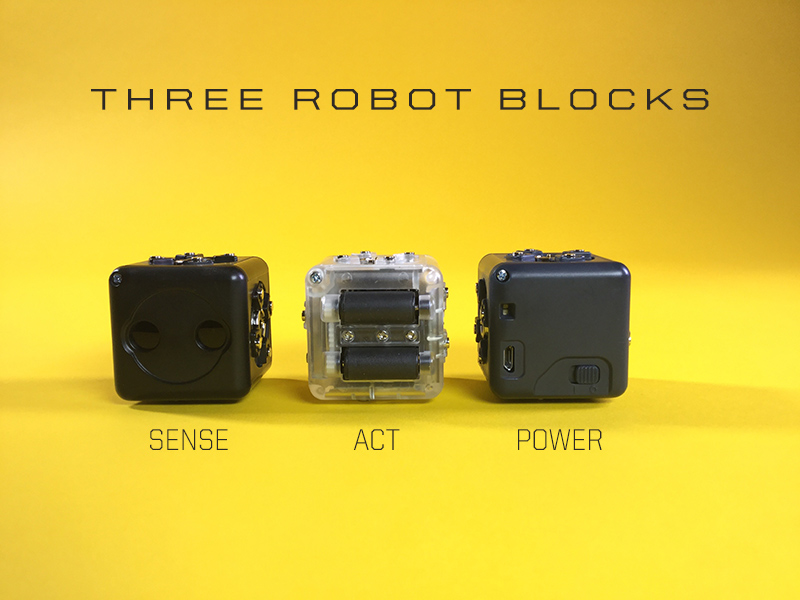
Break students into groups of 2-3 and give each group a basket of 6-9 Cubelets. Before students begin, review which types of cubes need to be used to create a robot: At least one black, Sense Cube, one clear, Action Cube, and a Battery Cube.
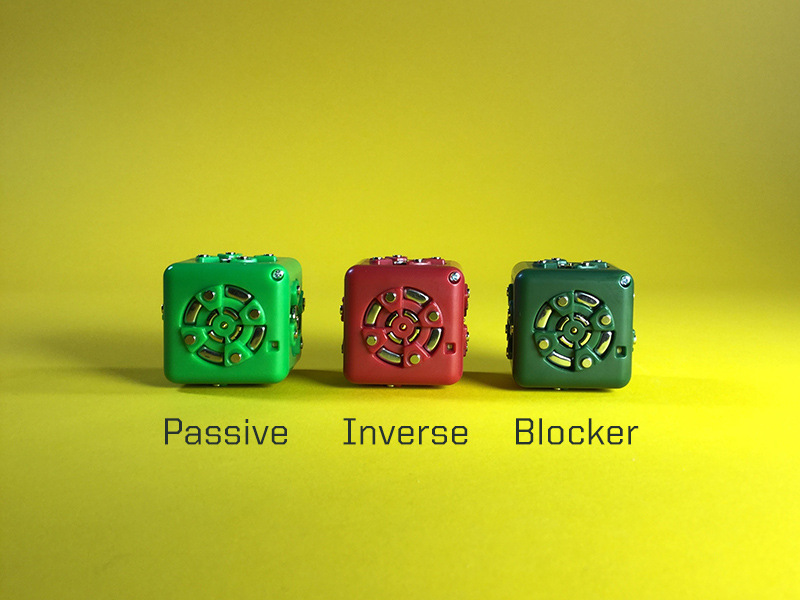
Review Think Cubes: Tell students that they may want to try some of the other colored, Think Cubes in the basket. Remember that Think Cubes like to tell other cubes what to do. Maybe one of the Think Cubes can tell the other cubes to light up in the dark.
Note:
A Think Cube must be between a Sense Cubelet and an Action Cubelet in order for the robot to use the Think ability.

Give students approximately 10 – 15 minutes to work on the challenge. Check in with groups to help guide their ideas and talk them through strategies to avoid frustration.
Guiding Questions:
- Which three cubes will you start with?
- What order are you going to add the cubes? Remember the Sense Cube has to tell the Action Cube if it should act, so maybe the Sense Cube should be first. Since the colored Think Cubes are kind of bossy and they tell the Action Cubes what to do, maybe one of them should go before the Flashlight Cubelet.
- What happens when you add one of the Think Cubes? Should you add one Think Cubelet at a time, or many?
- How will you test whether or not your Night-Lightbot will light up in the dark?
- What else can you try?
After several minutes, have student groups share if they were able to create a Night-Lightbot and show their designs. If students were not successful, ask them what they will try next time.
Note: Some groups may feel frustrated if they were not able to complete the challenge. This is okay. It is important for students to begin developing resilience and perseverance during difficult learning activities. Reassure them that the work they did was valuable by saying something to praise their efforts such as, “Your group worked hard to build and test robots today. What idea will you try later if you come back to this challenge?”
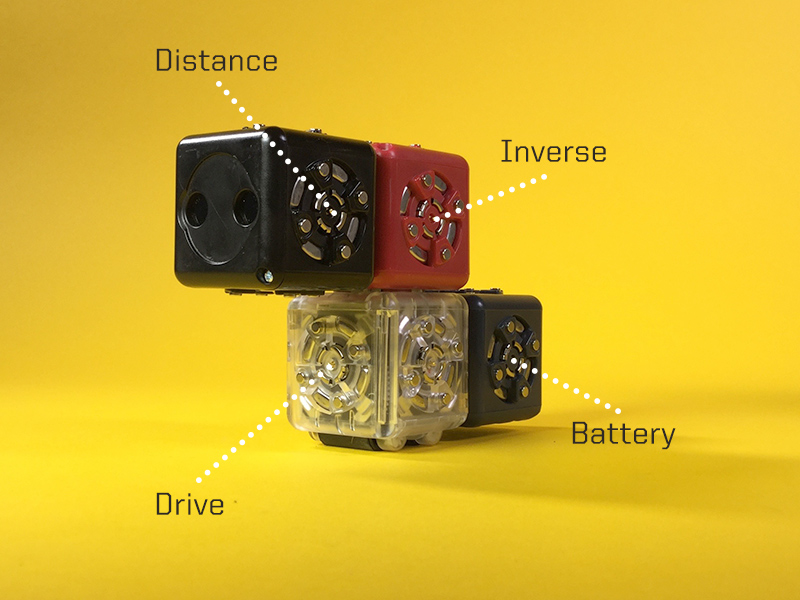
The Inverse Cubelet:
It may make sense to explore the Inverse Cubelet before beginning this design challenge.
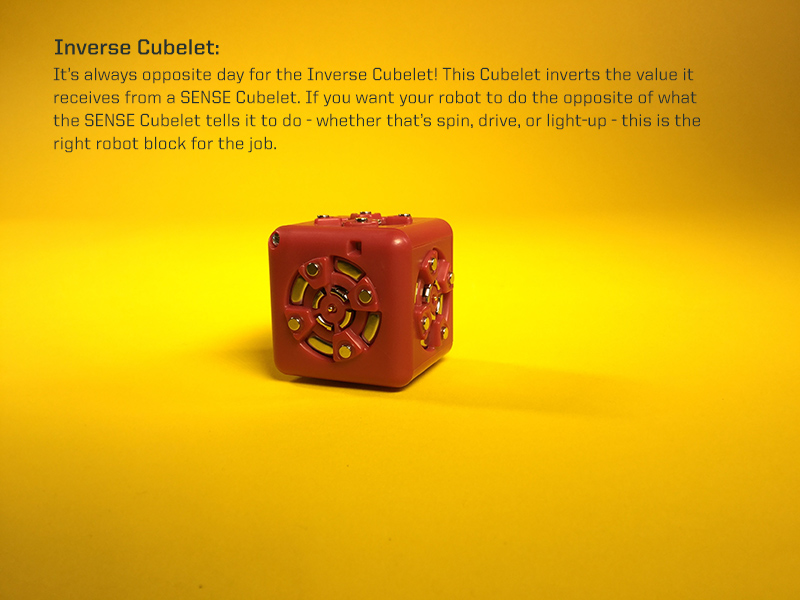
The Inverse Cubelet inverts the input and output values that the action cube receives from the sense cubes. To read more about how the Inverse Cube works, click on the link for Getting Started with Cubelets and read section 4 to see a Dimbot and 12 which shows how the Inverse Cubelet changes the Light-sensitive Dimbot to a Nightbot: https://archive.modrobotics.com/cubelets/cubelets-getting-started/
To explore this cube, build a basic Drivebot with students and record the direction the Drivebot travels. Ask student volunteers to help you drive it. Discuss what makes it drive. (The Drivebot drives when it senses something near it.)
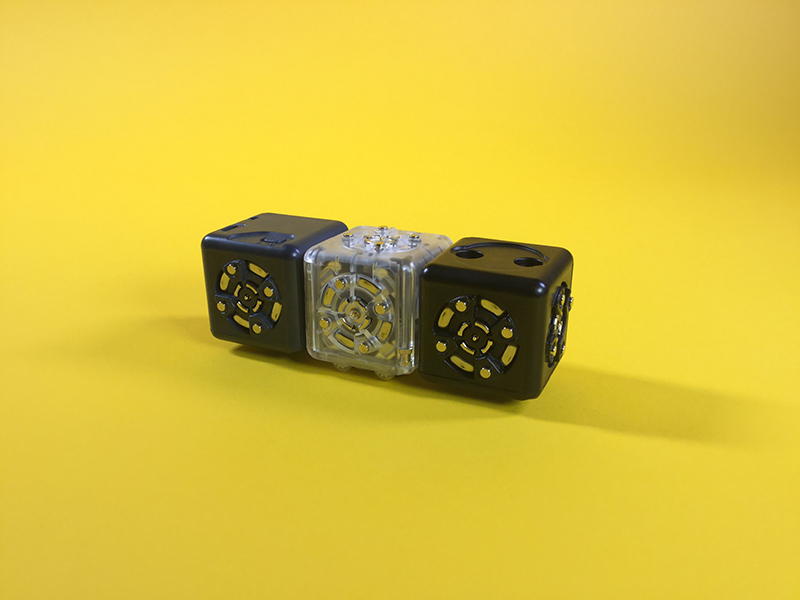
Then introduce the Inverse Cube. Tell students that the Inverse Cube is kind of like an opposite cube. Refer back to the senses lesson, and say, “When we studied senses, we learned that when our senses get information it is called an input. Sometimes our senses get a lot of input and sometimes they just get a small input. If you whisper, the ears around you get a small input, but if you shout, the ears around you get a big input.
The Inverse Cube makes it the opposite! It would be like if a whisper sounded like a loud shout and a shout sounded like a tiny whisper!
What do you think will happen when we put the Inverse Cube on the Drivebot?
Guiding Questions:
- Will the Drivebot drive faster?
- Will it stop driving?
- Will it drive in the opposite direction?
Test student ideas by adding the Inverse Cube and recording and discussing the results. (When adding the Inverse Cube to the Drivebot, the Drivebot will stop when it senses something near it and will drive when it does not sense anything near it.)
>
Assessment Ideas:
Students can be assessed observationally on their ability to work as a team to create a Night-Lightbot that lights up in the dark.
Additionally students can be assessed observationally in the following areas:
- Social emotional interactions throughout collaborative, problem solving opportunities
- Speaking and Listening contributions during book discussion
- Participation in counting activities related to Question of the Day
Classroom Management Tips:
- Put on the Brakes: If your students are very young, make sure you introduce only one sense cube at a time and then let students explore using only that sense cube before introducing another sense. This will cut back on teaching time and will allow students opportunities to make connections before they dive into new material. You can also limit the number of action cubes if you want, so everyone can work with a partner to build the same robot at first. Remember: If students struggle using the materials well, you can always revisit early lessons in this unit!
- Cubelets are a Team: Remind students of the following expectations for working with Cubelets:
- Work Together – Sharing and taking turns helps us work as a team.
- Respect Materials – Teammates and scientists take care of their equipment. Use Cubelets with safe, gentle hands and always return them back to the place you found them.
- Talk it Out – Team members take turns sharing ideas about what will happen and what to do next!
- Split the Kit: Using multiple kits or splitting up a larger kit can help students access more materials which can decrease sharing issues. Remember that if you split up a larger kit, every group will need a Battery Cubelet. If using more than one kit, it can be helpful to number the kit and the cubes or print out a list of cubes that go with each kit, so kits remain separated.
- Charge It: Remember to charge the batteries for your cubes before and after each experience. If you have extra batteries it’s helpful to have these charging, so there are backups.
Reading your Cubelets: Every Cubelet has a small LED light in one corner which flashes (except for the Battery which stays solid). When the Cubelet is part of a robot and the robot’s Battery block is turned on, the LED light is on too. This LED light shows that the Cubelet is getting power and talking to its neighbors. Each Cubelet robot must have one Battery block, which powers all the other blocks in the robot.
The Battery block has a small switch. When you slide it to the O, the Battery block is off. Slide to the line and it is on. Turn it off to save battery life when you aren’t playing with your Cubelets.
The Battery block has an internal, rechargeable, battery. To recharge the Battery block, plug it into a micro-USB power source.
If you’d like a more indepth look into how Cubelets work, visit the Cubelets Getting Started Guide.
- Call for Backup: If group management becomes challenging in your setting, consider asking a parent volunteer or older student to come in and assist with activities. Young students are initially very excited and eager to build, so there will likely be lots of enthusiasm. If student enthusiasm makes it difficult for them to share or use the materials appropriately, consider going back to lesson one, Cubelets are a Team, so students can have additional opportunities to practice using and sharing the Cubelets.
This work is licensed under a Creative Commons Attribution-ShareAlike 4.0 International License.
![]()