A.K.1 | Cubelets are a Team
An Introduction to Robots and Cubelets
Created by: Brandy Ray
Lesson Overview:
In this introductory lesson, inquiry-based experiences will give students opportunities to build familiarity with Cubelets as well as appropriate strategies for interacting with the materials. We also recommend reading the Education Information Sheet for additional information regarding lesson plans.
The Basics:
Ages: 4-7Time: 20 – 30 minutes depending on experience choices
Prep Time: 5 minutes
Lesson Objectives (for the students): Students will investigate Cubelets to understand how cubes work together to create robots.
21st Century Skills: creative thinking, technology literacy, social skills
Concepts: Speaking and Listening, Science, Technology
Required Cubelets: Mini Makers or original Modular Robotics Educator Packs broken into sets of 4-6 and a battery.
The Standards:
ISTE: International Society for Technology Education- ISTE Standard – Community and Collaboration 2.D Contribute to project teams to produce original works or solve problems
- CCSS.ELA-LITERACY.SL.K.1.A: Follow agreed-upon rules for discussion (e.g., listening to others and taking turns speaking about the topics and texts under discussion.)
- CCSS.MATH.CONTENT.K.CC.B.4: Understand the relationship between numbers and quantities; connect counting to cardinality.
- Pre-K TS GOLD Standard 17 – Literacy: Participates positively in group activities
- Pre-K TS GOLD Standard 20 – Math: Uses Number Concepts and Operations B. Quantifies
Lesson Plan:
I. Anticipatory Set – What does Teamwork look like:
Ask students to draw a picture of what teamwork looks like. When they are finished, have them share some of their ideas. Build on the idea that teamwork looks like:
- Working together
- Sharing materials
- Taking Care of the each other and our things
- Helping one another
II. Introduce Materials:
Today we are going to investigate Cubelets. Cubelets are small robots that work together to build different types of robots. Before we begin using the new materials, it is important that you know that Cubelets always work as a team. They cannot work alone. Since Cubelets have to work as a team, it is up to us as scientists to work as a team when we use them. When we play with Cubelets, working as a team looks like:
- Work Together – Sharing and taking turns helps us work as a team.
- Respect Materials – Teammates and scientists take care of their equipment. Use Cubelets with safe hands and always return them back to the place you found them. Using Cubelets with safe hands means playing with them gently and taking care of the pieces.
- Talk it Out – Team members take turns sharing ideas about what will happen and what to do next!
Expand Vocabulary:
Use and define these words in your lesson to build academic vocabulary.
- Investigate – study to discover new information
- Scientist – a person who studies science
III. Introduce the Battery:
Many teams have a captain, or leader. Without the team captain, the team has a hard time working together. In the Cubelets team, the Battery cube is like the captain. The Battery cube gives power to all the other cubes. Without the Battery cube, none of the other cubes will work!
Each kit only has one Battery cube, or team captain. That is one of the important reasons we have to remember Cubelets are a team. If we all try to make our own robot out of the cubes, instead of building one robot as a team, the robot without the battery won’t work.
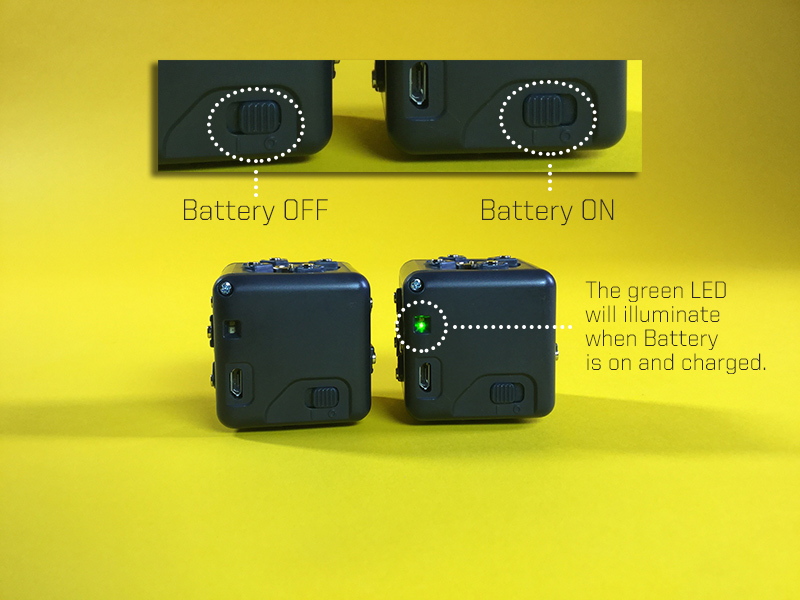
Show students how to turn on the battery and how to make sure other cubes are getting power by looking for a blinking green light.
IV. Initial Experience Ideas:
Choose an initial experience that will work well for your class, or start with Experience 1 first and then try Experience 2.
Note: Before starting more involved work with the Cubelets, many students in this age group will benefit from opportunities to practice using teamwork with the materials. In addition to teamwork practice, the experiences below are designed to give students hands-on opportunities to explore how Cubelets work.
Experience 1: Station Exploration
Sets of 4-6 Cubelets made with the Mini Makers Educator Pack with all Think Cubes removed. Each set will need at least one Battery.
Time: 5-10 minutes per group
Student Guided
Experience Guide:
Providing students opportunities to freely explore the materials to build background knowledge about how Cubelets work and how to negotiate using them in a group can be helpful for young learners.
- After introducing the Cubelets and discussing the teamwork rules, let students know that you will be introducing the Cubelets as a center choice for the day. Tell students that only 2-3 people should be at that center at a time.
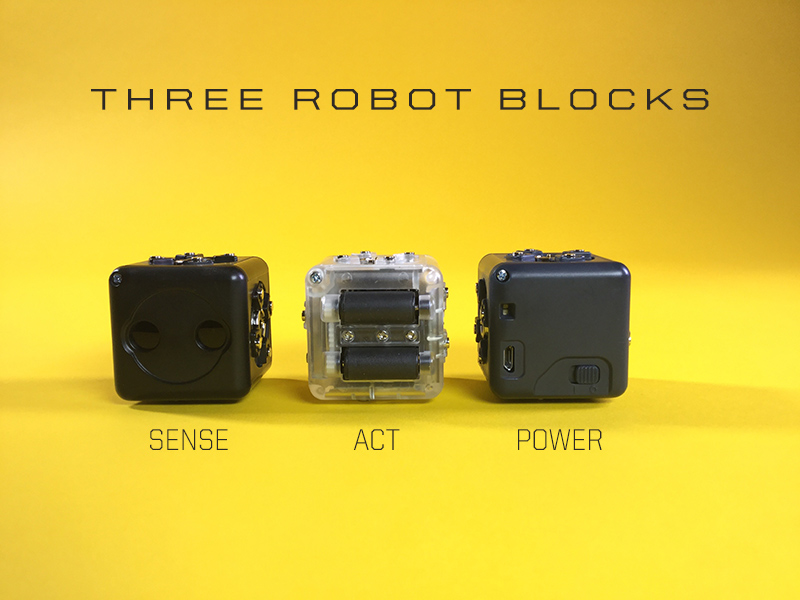
Remind students that they always need to start with the Battery cube, because it gives power to all the other cubes. (Show students how the green light blinks on all the cubes if they are getting power.) To make a robot they will also need to use at least one black, sense cube and one clear, action cube. You can model creating a robot for them by combining a Battery cube, Drive Cube, and Distance cube. Tell students:
“It takes a Battery cube, clear cube, and black cube to make a robot. These cubes help the robot sense, think, and act. If your robot doesn’t work right away, try putting the cubes in a different order. Also, if you see a green light blinking on the cubes, then you know they are getting power to run. Make sure the green lights flash on all the cubes.”
- Give student groups 5-10 minutes to explore the materials before rotating to another group. Check on groups from time to time to offer simple tips like putting a hand near the Distance cube to create an action, or making sure all the cubes are getting power.
- Optional: If students are older, or if they have had some initial opportunities to play with Cubelets, you can encourage them to start documenting their work. Tell students that as scientists at this station, they can keep track of their work just like real scientists. Model one of the strategies in the “Connect to Math” section to show students how they can keep track of the different types of robots they have built. Let them know that if they put the Cubelets together and the Cubelets do an action like light up or drive, they have created a new robot. Anytime they make the Cubelets do something new, they can draw a counter or add a new number, because they’ve built a new robot! Make it a game! How many robots can you create?
Notes: While students may not be ready to keep track of every iteration of robot they are able to build at the center, this math connection can begin to help students understand that changing the sequence and cube type of the Cubelets can cause new types of robots to be built.
Content Connection | Connect to Math – Ask students to keep track of the types of robots they were able to build by drawing the corresponding number out of a bucket. (Magnetic numbers, or other number manipulatives can be used.)
If students are not yet connecting the counting with written numerals, ask them to draw a counter from a bucket every time they make a new robot and count the counters at the end. Use chips, bear counters, or other counting tools.
Experience 2: Buddy Build
Sets of 4-6 Cubelets made with the Mini Makers Educator Pack, Each set will need at least one battery.
Time: 15 minutes
Guided Activity
Experience Guide:
-
Build it Up:
- Begin by breaking students into partners of 2-3 students.
- Starting with the Battery cube, have students take turns choosing a cube to add.
- Once all the cubes have been added, turn the battery on.
- Analyze: What actions does your robot perform?
- Predict: What is making your robot perform these actions?
Have students take turns discussing the following questions:
Change It:
- Have students take turns rearranging one of the cubes to explore what happens when the sequence is changed. As they rearrange the cubes, ask students to predict and notice how the robot will change.
Tear It Down:
- After students have rearranged the sequence of cubes a few times, ask each student to take one cube off at a time ending with the battery cube. Students can discuss what changes they notice.
Content Connection | Connect to Writing – After or during the investigation, have students choose one robot design to draw. Students can draw and/or color squares to show the sequence of the Cubelets and then use writing or emergent writing to tell what the robot did in this sequence.
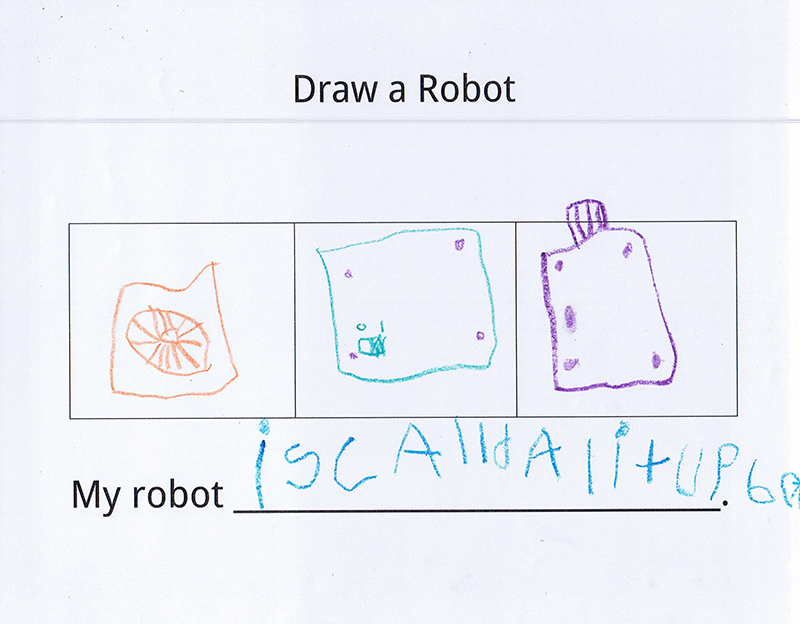
If students use emergent writing, their response can be dictated and written by the teacher.
Students can also cut out and glue paper Cubelets together to show what they’ve made or to come up with ideas for new Cubelet combinations they want to try. Paper Cubelet copies can be found here:
If students struggle to cut pieces out, teachers can print and cut out several of the paper cubes, leaving out the Cubelets that are not used in this lesson.
Assessment:
At this stage, assessment should be used to determine student’s comfort with the materials and awareness that all Cubelets robots must include a battery and at least one Action, and one, Sense Cube. This concept will be built on in subsequent lessons. If students struggle to grasp this concept to some extent during the first learning experience, they may benefit from additional opportunities to explore the Cubelets during free play times.
Classroom Management Tips:
- Split the Kit: Using multiple kits or splitting up a larger kit can help students access more materials which can decrease sharing issues. Remember that if you split up a larger kit, every group will need a Battery Cubelet. If using more than one kit, it can be helpful to number the kit and the cubes or print out a list of cubes that go with each kit, so kits remain separated.
- Charge It: Remember to charge the batteries for your cubes before and after each experience. If you have extra batteries it’s helpful to have these charging, so there are backups.
Reading your Cubelets: Every Cubelet has a small LED light in one corner which flashes (except for the Battery which stays solid). When the Cubelet is part of a robot and the robot’s Battery block is turned on, the LED light is on too. This LED light shows that the Cubelet is getting power and talking to its neighbors. Each Cubelet robot must have one Battery block, which powers all the other blocks in the robot.
The Battery block has a small switch. When you slide it to the O, the Battery block is off. Slide to the line and it is on. Turn it off to save battery life when you aren’t playing with your Cubelets.
The Battery block has an internal, rechargeable, battery. To recharge the Battery block, plug it into a micro-USB power source.
If you’d like a more indepth look into how Cubelets work, visit the Cubelets Getting Started Guide.
- Station Management: Using a station management system can increase independence as students rotate through centers. Check out this resource for some great ideas on center time management: http://www.pre-kpages.com/centertime/
- Call for Backup: If group management becomes challenging in your setting, consider asking a parent volunteer to come in and assist with activities.
This work is licensed under a Creative Commons Attribution-ShareAlike 4.0 International License.
![]()