Using Cubelets Blockly, you can code every single Cubelet within your robot construction. But what does this mean? And how does it compare with coding in other contexts?
User Interface
Cubelets Blockly functions very similarly to other visual programming languages like Blockly or Scratch by using a drag and drop functionality of function blocks that hook together like puzzle pieces. Cubelets Blockly has a few of its own blocks, however, that you won’t find anywhere else. That’s because Cubelets are such a unique robot-building experience. Check out Episode 9.1 of our Create with Cubelets series to learn more!
Parallel Systems
Instead of programming your Cubelets robot to move forward, turn right, and move forward again; you’ll be programming each part of your Cubelets robot independently. Remember when we explored Personality Swaps recently? Personality Swaps are a great way to illustrate the difference between coding an axled vehicle versus a modular vehicle. When coding our modular vehicles, we program the left wheel and the right wheel separately. It’s a deep-dive into what actually happens when any vehicle turns. (Spoiler: you can create a steering robot without coding your Cubelets!).
As soon as you program more than one Cubelet in a robot construction, you’ve programmed a parallel system! This is generally a high school computer science standard, but all it means is that you’ve programmed multiple computers (the Cubelets themselves) to execute tasks related to each other that all happen at the same time.
Cubelets are an incredible way to explore and understand parallel systems. Contrast your Cubelets programming experience with other linearly-coded robots and it’s quick to see how much more complex the Computational Thinking is behind coding a Cubelets robot!
Getting Started with Cubelets Blockly
If you’re interested in introducing Cubelets Blockly to your students, you may enjoy the scaffolded Create with Cubelets video series we created specifically for you. The first few videos are all about the basic user interface (how to save a program, how to pair your Cubelets to your coding device, how the coding blocks are organized, etc.) and then we begin to introduce a few basic coding challenges. In the description for each of these scaffolded introductory coding challenges, you’ll find Student Resource Sheets for students to use after they’ve viewed the challenge video.
Starting with episode 09.2, I recommend students watch the video first, then use only the Student Resource Sheet once they are coding in Cubelets Blockly. This supports the gradual release of responsibility that is best practice when introducing new processes. The video is the “I do”, the Student Resource Sheet provides support during the “we do” section, and as students get more comfortable with the interface, they may eventually not need the Student Resource Sheet which is the “you do” part of the learning arc.
Once students are comfortable with the Cubelets Blockly interface, I recommend they use Cubelets Blockly to improve and refine some of their default robot builds (think: Maze Solver, Lighthouse, Characters).
A quick note about loops
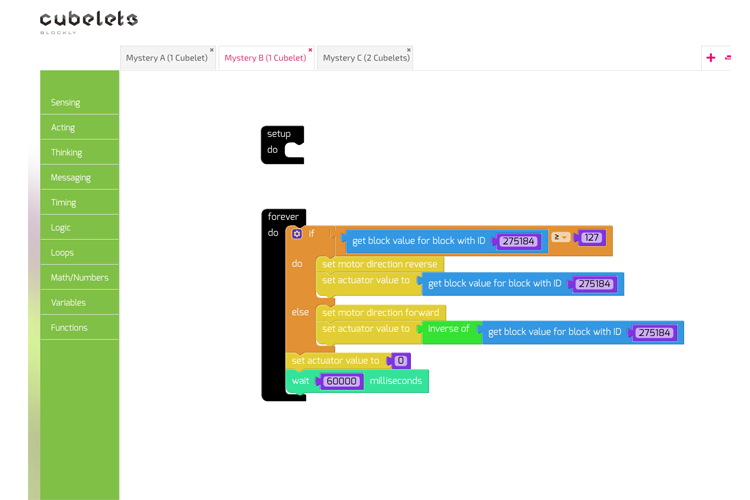
In Cubelets Blockly, most of the blocks you use will be placed inside a ‘Forever Do’ loop.
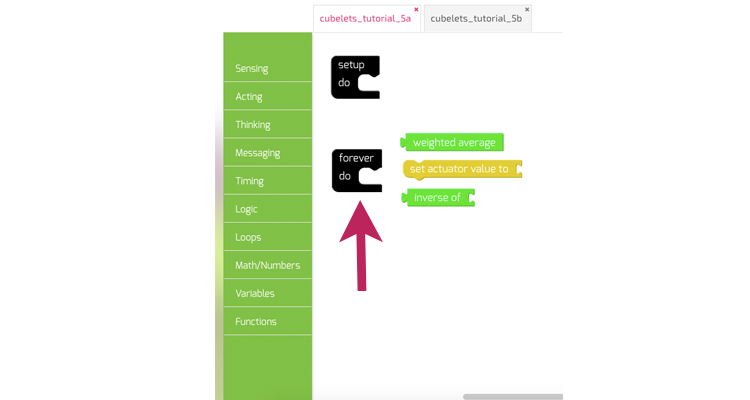
This means every code you write inside that block will constantly be repeated. This is fundamentally different than other coding programs where your sprite will only complete the steps you assign one time unless you put them inside a loop.
A helpful tip!
It’s important to know a couple key tips and tricks before you dive into coding Cubelets as parallel systems, especially if you’ll be running investigations using the Remote Control part of the Cubelets app.
First, if you use the set actuator to block in your code, the Remote Control will not be able to read your robot’s behavior. This is because the remote control is looking for specific variables, so you’ll need to define and use a variable in your program in order to measure it. Note: if you are trying to measure with the Bar Graph instead of the remote control, you will see similar issues. Check out Create with Cubelets episode 9.2 for a great example of what this looks like in Cubelets Blockly!
Enjoyed this blog post? Sign up for the #CubeletsChat newsletter to receive the next blog post straight to your inbox. Plus join the discussion on twitter using the #CubeletsChat hashtag!